Thursday, July 31, 2014

DIY Nautical Bathroom Art


Wow! You can really tell that we've been having tons of fun in the summer heat, as I haven't posted anything in quite some time.  That doesn't mean I haven't been busy around here though!  I have plenty of projects to show all of you in the next little while.  ;)

Starting with this super easy art piece that I made for our son's bathroom.  It's such a cool bathroom and I decided to decorate it with a nautical style (before and after shots to come soon!).

I don't really have any progress pictures to show you here because it was really so easy it wasn't needed.  Basically, I painted three 5x7" canvases that I bought on sale at Michaels.  I had two of the blue colors already and for the light blue, I mixed white paint with the blue I already had.  For the whale, I found an image from the Silhouette gallery and cut that out in white vinyl.  I had to draw part of the water spout and the water droplets free hand in the Silhouette program and then cut them out separately, which was tricky but I think it turned out pretty good!

I bought a pre-cut wooden anchor at Michaels as well (only 59 cents!), and wrapped jute around it.  Then I used a staple gun and ran a string of jute from the anchor to the canvas pieces.  I tucked and tied the jute to the anchor and stapled at the top and the bottom of each canvas piece.  And that's all there was to it!
I fell in love with this piece that I found from SennandSons and completely copied it.  I am sure that the quality of the image and the canvas on the piece that they are selling is way better than mine, but at their price point ($150!), I can totally live with mine.  I hope you like it!

Friday, June 27, 2014

DIY Craft Table

I finally did it!  I have been wanting to build my son a table that he can color and do crafts on for some time now.  At first, I was just going to buy one.  Except I was pretty particular about how I wanted the table to look and I wanted it to be built sturdy, so that it would last him a long time.  The one that I found was from Pottery Barn and it was going to cost me at least $220.  I was having a hard time with that price.  I did not pay that much for this table, however...I did have to buy a few tools in order to make this, and I learned that if you want good quality materials, you are going to have to pay a little to get it!  Throughout my journey of making this table I learned a lot and sweated a lot (I made it outside in the 32 degree Celsius heat!).  I love how the table looks and most importantly I know that this table will stand up to a lot of fun for years to come!

The actual process of building the table took me an hour and a half.  No joke.  I was shocked!  And I even learned how to use a pocket hole jig for the first time during that 90 minutes.  Here's how I did it:

I used the plans from Ana White's farmhouse play table and simply chose a different style for the legs.  For the top of the table I used a 4' x 2' birch board.  The aprons are 2x1 poplar boards cut to the same dimensions as outlined in Ana's plans.  Finally, for the legs I used 2x2 poplar boards cut to 18".

Here's the table before I added the paper roll:
We just couldn't wait to try it out!!
It took me a few trips to Lowes and some brainstorming to come up with how I was going to add on the paper roll holder that I wanted the table to have.  I finally came up with attaching a wooden closet rod holder (definitely the technical term), to two small pieces of wood that I screwed to the top of the table using my new pocket hole jig!  Then I trimmed a piece of a wooden dowel to size and plunked it into the rod holder.  By using the curtain rod holder I am able to easily change the paper roll when needed.  I get my paper rolls from IKEA because they're cheaper, but I think Melissa and Doug also carry replacement paper rolls for their easel, which could be used as well.

The last step was to put one coat of primer and three coats of white paint on the table.


The two chairs are from IKEA.  I think they look great with the table.  I may have some future plans to paint them, but for the space they are in right now, they're perfect!


Monday, June 9, 2014

Do-it-Yourself Indoor/Outdoor Pouf

Ok...I'm calling this a pouf because the concept is the same, however it is definitely a king size version of a traditional pouf.  This thing is huge!  When I thought this project up in my head, I was sitting in the backyard watching my son play on the lawn with his little plastic chairs and I was thinking "wouldn't it be great to have something he could use outside as a table where he could rest his snack on, but also something versatile enough so that he could lay and play on it too?".  And this is what I came up with!

It is perfect for lounging on in the backyard!


It wasn't very difficult to make.  I followed the guidelines here for making a smaller floor pouf, and just made mine larger.  My dimensions are: 48"x27" for the top and bottom pieces and all of the sides are 13" high.  I used indoor/outdoor fabric that I found for a good price online at Warehouse Fabrics Inc.  And I also used upholstery/canvas thread and a heavy duty needle for sewing jean material.  I basically sewed all the pieces together and sewed a 22" zipper on one edge.  I will admit that I was pretty nervous to start sewing this because I don't really know how to sew well...and when it came time to sew the corners, I got really nervous!  I had no idea how that was going to work.  But it just worked!  And when it came time to sew on the zipper I wasn't quite sure what I was going to do about that because I never sewed  a zipper before so...all I did was hem the edges and pin the zipper on each side (open the zipper up when doing this) and sewed it on.  There really was nothing fancy about this.  I'm sure it could have been accomplished with some fancy sewing maneuvers, but winging it worked just as well!

I used bean bag fill to fill mine up.  So far I have put 300 litres of fill in it and I feel that it could still use some more.  I sort of like the playful squishy-ness of the pouf as it is right now though, so it might stay like this for a while.

My son and his friends already love to jump all over it!

It is going to be a fun summer!

Thursday, June 5, 2014

Strawberry Rhubarb Spring Muffins

Last weekend our family drove out to a local berry farm and picked what appeared to be the last strawberries of the season.  It was so much fun showing our son the berries growing on the plants and and letting him taste a few (don't tell anyone!) that I picked for him.  He had a great time!  With a tractor ride to the field, fresh juicy strawberries warm from the sun,  and this place even had goats to feed...who wouldn't enjoy themselves!

It took me a while to clean all these juicy morsels of sweet strawberry goodness, but once that was done I decided to make some yummy muffins with them.  I love the combo of rhubarb and strawberry...the tartness from the rhubarb mixed with the sweetness from the strawberries...it really is a perfect match!  I found this recipe on "Taste of Home" and tweaked it a little to make it perfect for me.  I used 1 1/4 white flour and 1 1/2 whole wheat flour, which resulted in me needing to add a splash more milk to make the batter come together nicely.  I didn't have buttermilk on hand, so I squeezed half a lemon into regular milk instead.  Also...and I must admit this occurred completely by accident, as I forgot!  ...I didn't add the sugary nut topping on my muffins.  I'm always looking for healthy muffin recipes and although I didn't mess around with the oil or the sugar in this recipe, these muffins taste amazing!  And they're not that unhealthy.

The perfect spring time muffin.  Enjoy!

Friday, May 23, 2014

Pretty Display Boxes

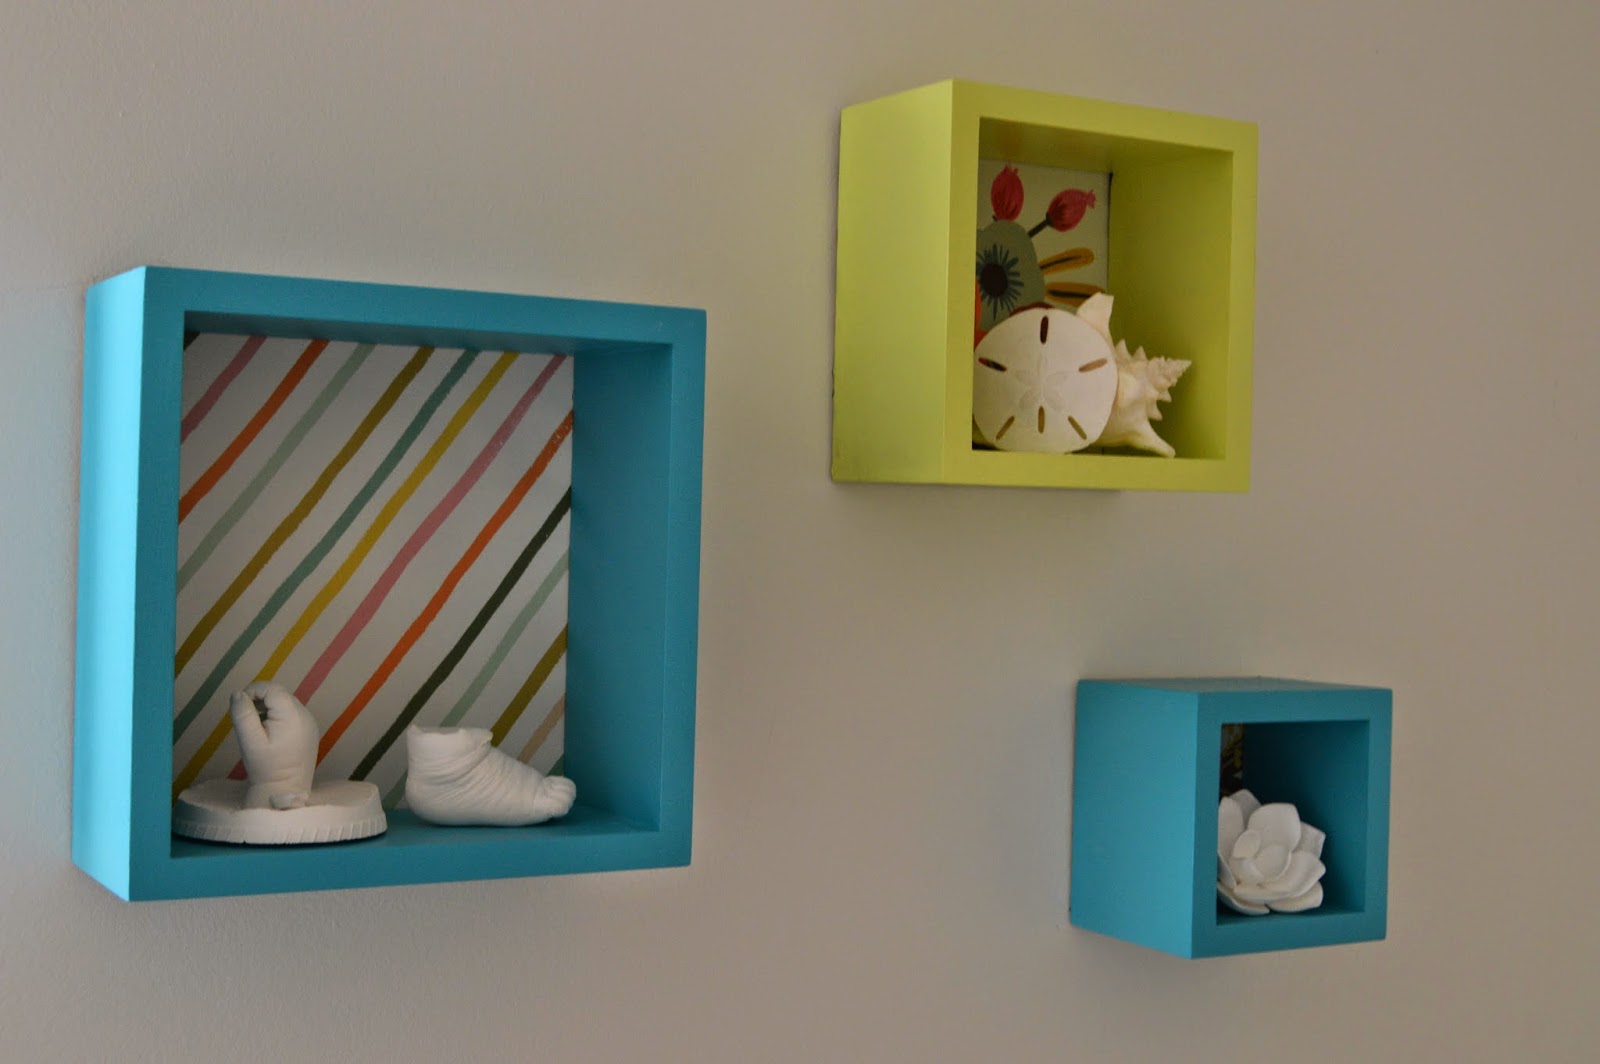
If you have a few ornaments or items that you want to display, but don't really have the right spot for them, I found a great solution!  These display boxes were so easy spruce up.

You can start with any box shelves or even boxes.  They sell wooden crate style boxes at Michaels, or I bet you could even use photo boxes as long as the items you are displaying are fairly light.
I started with three cube shelves that I had laying around the house.

I was just about to get rid of them because we weren't using them and they didn't really fit with my style anymore.  I am really glad I hung onto them!  You can find similar cube shelves at Target for $15.

Then I painted them and hot glued some pretty paper onto the back of them.

I think they look pretty cute!  And the best part is I have a place to display these small, delicate items like castings of my son's hand and foot!

Sunday, May 11, 2014

DIY Succulent Frame Planter


The weather has been BEAUTIFUL here for nearly a month now.  I am absolutely loving it, and of course, the first weekend that the garden centers opened up, I was there!  Which kind of made me a sucker because as I have learned, it takes a little while for the greenhouses to get all of their plants in!  Naturally, I have to learn things the hard way...but the way I saw it is that I would get a head start on the growing season and my plants would be that much bigger!

On one of my many trips to the garden centre I came across a tray of sedums (a type of succulent plant).  It looked so appealing that even though I had absolutely no idea what I was going to do with it, I brought it home.  After spending a few days searching for neat ideas on ways to use my sedum tray, I decided I was going to build a frame planter.  I came across some step-by-step instructions from Young's Garden Centre and thought it looked simple enough!  Except of course, I couldn't just buy a frame, I had to make one...

I found this crazy and wonderful place called Community Forklift.  They are basically a warehouse and yard filled with building supplies that were taken from excavation projects, donations, excess supplies from construction jobs...you name it, they probably have it.  But in a dirty, used form...  When I first stepped into the warehouse I felt very overwhelmed.  I was so excited to have found a place like this with so many hidden treasures!  ...and so much crap.  I literally spent an hour and a half in there and came out with two pieces of wood that cost me $2.  I think I'll do better next time...

They have a section of trim, which is where I found the trim that I used to make my planter frame.

I also found a piece of cedar that I cut and used for the back of my planter.

Step 1: Cut the trim to make the frame.  This took a lot of muscle!
Step 2: Glue the boards together to make the frame.  I also used a staple gun on the back to hold the sides in place as the glue was drying.

Step 3: Build the planter box that will sit behind the frame.  I bought a 6 foot 1x2" board and cut four pieces to the size I needed after I built my frame.  Then I pre-drilled the holes (I never realized just how important this step is.  And it is always so tempting to skip this step, but if you want to avoid splitting your wood, it's probably a good idea to pre-drill your holes).  Lastly, I screwed the pieces together, turning the top piece on its side, as it mentions in the instructions from Young's Garden Centre, to create a gap for watering.  I also drilled a few holes in the bottom board to allow for drainage.

Step 4: I cut the cedar board to create two pieces the size I needed.  Then before I attached them to the back of the box I drilled two holes into the top piece.  This allowed me to string a wire through the board before I attached the board to the box, making it easier on me when it came time to hang the frame.  Following?  Hope so.  

Step 5:  Screw the two boards onto the back of the planter box. 

Step 6: I used wood glue to glue the frame to the planter box.  You could use Gorilla Glue or any strong adhesive I would guess.  This is the step where you would fill the planter box with dirt and then attach a piece of gardening fabric over top of the dirt before gluing the frame on top.  I didn't do this, as I had a tray of sedums that I simply had to cut to the right size and plunk into my planter box. I did put a layer of potting soil in the planter prior to laying my sedum slab down in the frame.  

Step 7: So, I forgot to consider gravity...I needed to use about six very long nails to nail my sedum tray to the back of the planter, so that they wouldn't fall out!  

In hindsight, I would buy a frame for cheap rather than make one.  Unless you are awesome at making frames, which I am not...yet! I'm pretty determined to master that skill, however.  Overall, I think it is a cool little planter and kept me busy for an afternoon while my son napped.  


Wednesday, May 7, 2014

DIY Monogram Board

 
I promised that I would share what I did with the original growth chart board that I had painted and didn't like...this is it!  I flipped it over, added a giant "C", which I cut out on vinyl using my Silhouette and that's it!  I love the way it looks!  It is exactly what I was going for when I painted it, except when I had it sitting vertically for the growth chart it just didn't look right to me.  

As I mentioned before, I used a scrap piece of wood board from my Kitchen Bulletin Board/Chalkboard to make this.  Then I simply measured out and taped off the areas that I wanted different colours.  I was kind of winging it here, so I just went for it!  

I'll let you all in on a little secret of mine that I discovered and am pretty thrilled about.  I found these small sample size containers of Valspar paint at Lowes for under $3 each.  They can mix whatever color you want from the swatches of colours that they have too!  So, if you need a small amount of paint for your projects I highly recommend doing this.  The paint has worked great for me and I have avoided spending the money on "craft paint", but the best part is that I can pick the exact colours that I want!  Love it.

I think that my son's room is finished for now.  I also added a splash of colour by using elmers sticky tack to stick up some cool wrapping paper inside of the built in closet/dresser in his room.  I would have chosen to use wallpaper or even paint the wall, however since we are renting this was a super cheap idea that is a lot less permanent!

I hope some of these little projects have inspired you to take something you have and make it a little more interesting and fun!